CASE: you are a noob.. LAMP are just a word, and their meaning are LAMMER! You; a stupid stupid garbage that used windos in the past.. yes .. i take you piece of shit and make a men of you: today we will setup a computer installation environment for a full web stack developer.
LAMP are just a word, and their meaning are LAMMER! Lest get configure a right developer environment.
First of all you will need a right configured Debian, Devuan or VenenuX for that, best choice are pile of dockers containers.. but are too complicated so lest use the best for: Debian VenenuX or Devuan.
Please if you comes from winbuntu.. stop and get out of here..
If you have and old machine these images comes with all necessary, just ready to use with Openbox desktop:

Once as root you execute the following commands, each sequence or command you must execute is separated by a line of space:
After a while of downloading, according to the version of Debian you will have installed the software (lighttp, Mysql and PHP),
ADVERTISE NOTE DEVUAN: the command $(lsb_release -s -c) will output "jessie" "stretch" etc .. but Devuan names are not the same.. so you must write it manually when performs the commands to the console terminal.
Deploy to our home easyle event to the www htdocs: those commands configures the webserver in our document directory. Named "Devel", this directory can contain web service and php files without having to be root "www" directory neither need root access to html root directory:

Testing the home easy web place to web server: We test the web server and our directory by placing a check mark in the address of the user name, for example the

We already have in equivalent to LAMP environment (web server and php with mysql), now we need the text editor for source code and the change and version control manager:
So then again if not, get root access by typing "su" command:

Once as root you must execute the following commands, each sequence or command you must execute is separated by a line of space:
MYSQL WORKBENCH IMPORTANT NOTE: IF FAILS WITH ERROR
If the command resulted in an error that the package "mysql-workbench" does not exist repeat that command but removing the "myql-workbench" from it, it happens only in Debian 10, for this you must download from the oracle website the one for ubuntu 18 and install in Debian 10 with dpkg -i mysql-workbench*.deb from the directory where it was downloaded.
After installation you will have it ready to run from the "Develop" menu:

.

1. An IDE or Integrated Developer Environment (geany)
2. A GIT (giggle) operator interface
3. A diff file comparison interface (meld)
4. Two IDE SQL handlers (mysqlworkbench, pgadmin)
In addition to this I also install:
1. A web server (lighttpd, instead of apache2)
2. The engine for webs ( php )
3. An database server (mysql server)
The first list are only GUI related and the second are the server side software but on your machine!
When you code, you do it in an IDE (geany) editor, this code is uploaded to the server (emulated in your house) and by interpreting the services (lighttpd/apache2 + php) a web page is displayed.
The data of this page is handled in time by putting it in the database (mysql) and at home you make the tests using the IDE SQL tool (mysqlworkbench), to verify that the data programmed in the IDE (geany) editor are correct.
So the most used tool is the IDE (geany) editor here:

From were i worked the projects?¡ the "Devel" directory

.

.
 |
| JWM runnin meld, giggle, geany and mysqlworkbench |
LAMP are just a word, and their meaning are LAMMER! Lest get configure a right developer environment.
The Operating system
First of all you will need a right configured Debian, Devuan or VenenuX for that, best choice are pile of dockers containers.. but are too complicated so lest use the best for: Debian VenenuX or Devuan.
Please if you comes from winbuntu.. stop and get out of here..
If you have and old machine these images comes with all necessary, just ready to use with Openbox desktop:
- Debian 7 LAMP: Very old machines 2006 to 2012 -> https://sourceforge.net/projects/vegnuli/files/VenenuX-1.0/venenux-1.0-osposweb/debian-7-venenux-i386-20190531-snap.iso/download
- Debian 8 LAMP: Machines from 2010 to 2015 -> https://sourceforge.net/projects/vegnuli/files/VenenuX-1.0/venenux-1.0-osposweb/debian-8-venenux-i386-20190531-snap.iso/download
1.- INSTALLING OF ALL YOU WILL NEED
First of all get root access by typing "su" command:
Once as root you execute the following commands, each sequence or command you must execute is separated by a line of space:
apt-get purge --force-all mariadb* mysql*

cat > /etc/apt/apt.conf.d/50venenuxcustom << EOF
APT::Get::AllowUnauthenticated "true";
Acquire::AllowInsecureRepositories "true";
Acquire::AllowDowngradeToInsecureRepositories "true";
Acquire::Check-Valid-Until "false";
EOF

cat > /etc/apt/sources.list.d/51-mysql.list << EOF
deb http://repo.mysql.com/apt/debian/ $(lsb_release -s -c) mysql-5.6
deb http://repo.mysql.com/apt/debian/ $(lsb_release -s -c) mysql-5.7
deb http://repo.mysql.com/apt/debian/ $(lsb_release -s -c) mysql-tools
EOF

apt-get update

apt-get -y --force-yes install mysql-server mysql-client mysql-common \
mysql-community-server libmysqlclient20

apt-get -y --force-yes install lighttpd spawn-fcgi apache2-utils

apt-get -y --force-yes install php php-common php-cgi php-fpm php-cli \
  php-curl php-mbstring php-mysql php-bcmath php-xml php-xmlrpc
After a while of downloading, according to the version of Debian you will have installed the software (lighttp, Mysql and PHP),
ADVERTISE NOTE DEVUAN: the command $(lsb_release -s -c) will output "jessie" "stretch" etc .. but Devuan names are not the same.. so you must write it manually when performs the commands to the console terminal.
Lest configure it:
now you have to integrate its settings to the web server, executing the following commands separated each one by an empty line:sed -i 's/bind-address.*=.*/bind-address=127.0.0.1/g' /etc/mysql/mysql.conf.d/mysqld.cnf
/usr/sbin/service mysql restart
/usr/sbin/lighty-enable-mod accesslog fastcgi-php dir-listing status userdir usertrack
sed -i -r 's|userdir.path.*=.*|userdir.path = "Devel"|g' /etc/lighttpd/conf-available/10-userdir.conf
for i in $(ls /home);do mkdir -p -m 777 /home/$i/Devel ;done
echo " /var/www/html/infophp.php
rm /var/www/html/index.lighttpd.html
/usr/sbin/service lighttpd restart
Deploy to our home easyle event to the www htdocs: those commands configures the webserver in our document directory. Named "Devel", this directory can contain web service and php files without having to be root "www" directory neither need root access to html root directory:

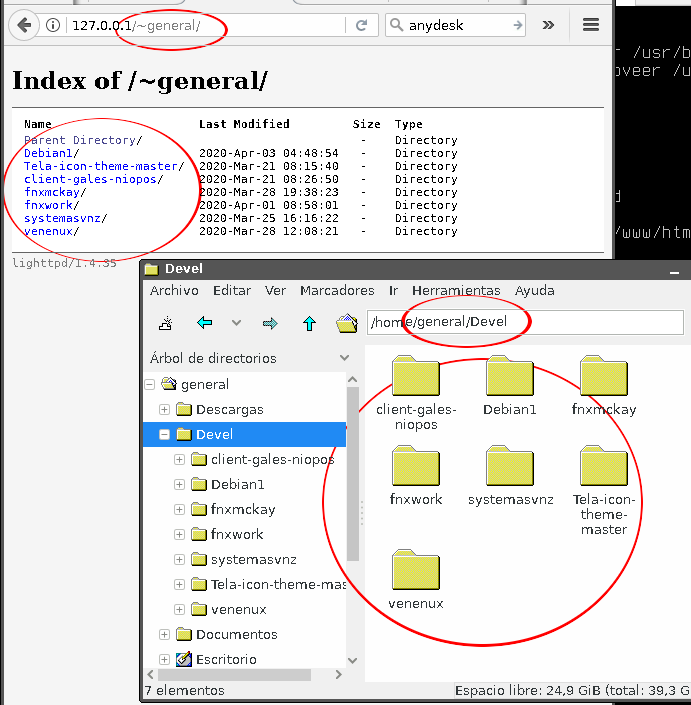
Testing the home easy web place to web server: We test the web server and our directory by placing a check mark in the address of the user name, for example the
/home/usuario/Devel can be browsed in the web browser as http://127.0.0.1/~usuario/ check the picture:
2.- INSTALLATION OF TOOLS AND IDE
We already have in equivalent to LAMP environment (web server and php with mysql), now we need the text editor for source code and the change and version control manager:
So then again if not, get root access by typing "su" command:

Once as root you must execute the following commands, each sequence or command you must execute is separated by a line of space:
apt-get --ignore-missing -y install geany geany-plugins giggle git meld mysql-workbench
MYSQL WORKBENCH IMPORTANT NOTE: IF FAILS WITH ERROR
If the command resulted in an error that the package "mysql-workbench" does not exist repeat that command but removing the "myql-workbench" from it, it happens only in Debian 10, for this you must download from the oracle website the one for ubuntu 18 and install in Debian 10 with dpkg -i mysql-workbench*.deb from the directory where it was downloaded.
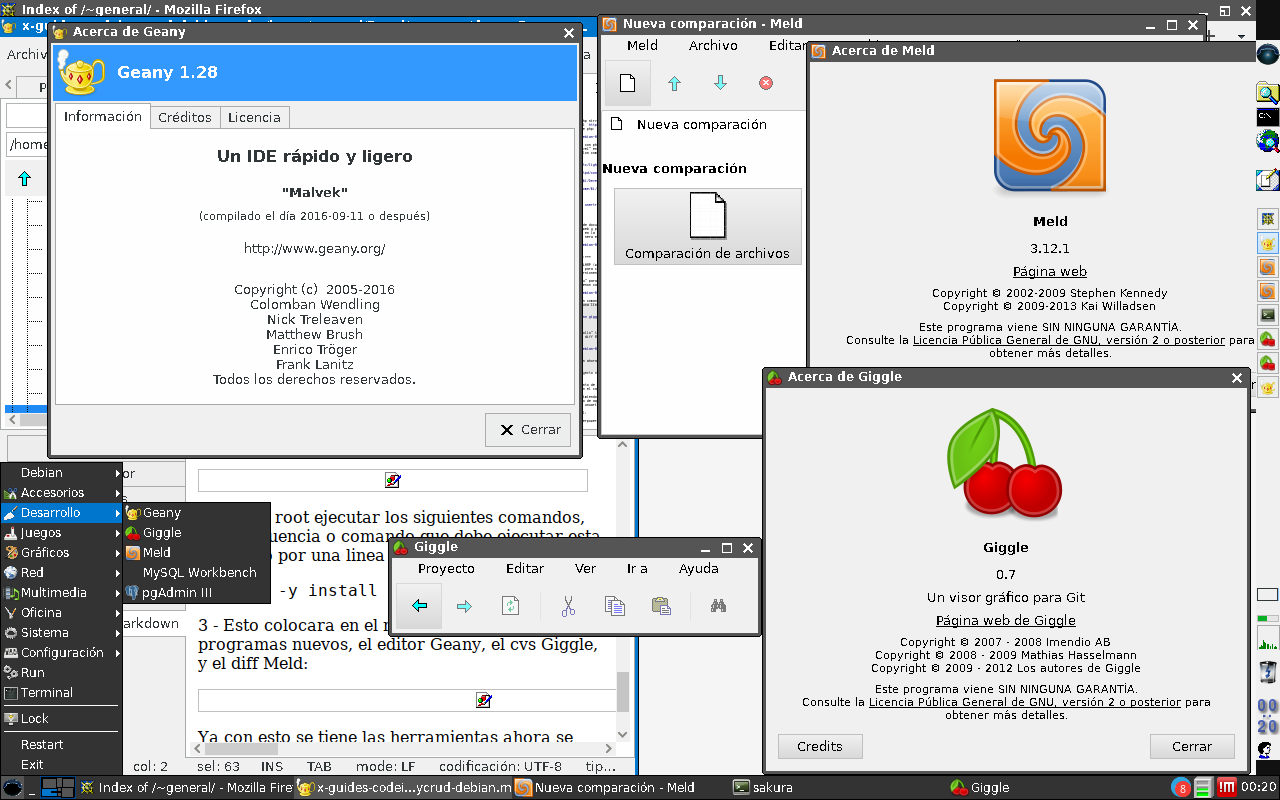
After installation you will have it ready to run from the "Develop" menu:
.
3.- HOW TO USE MY NEW TOOLS
You installed 5 new tools:1. An IDE or Integrated Developer Environment (geany)
2. A GIT (giggle) operator interface
3. A diff file comparison interface (meld)
4. Two IDE SQL handlers (mysqlworkbench, pgadmin)
In addition to this I also install:
1. A web server (lighttpd, instead of apache2)
2. The engine for webs ( php )
3. An database server (mysql server)
The first list are only GUI related and the second are the server side software but on your machine!
When you code, you do it in an IDE (geany) editor, this code is uploaded to the server (emulated in your house) and by interpreting the services (lighttpd/apache2 + php) a web page is displayed.
The data of this page is handled in time by putting it in the database (mysql) and at home you make the tests using the IDE SQL tool (mysqlworkbench), to verify that the data programmed in the IDE (geany) editor are correct.
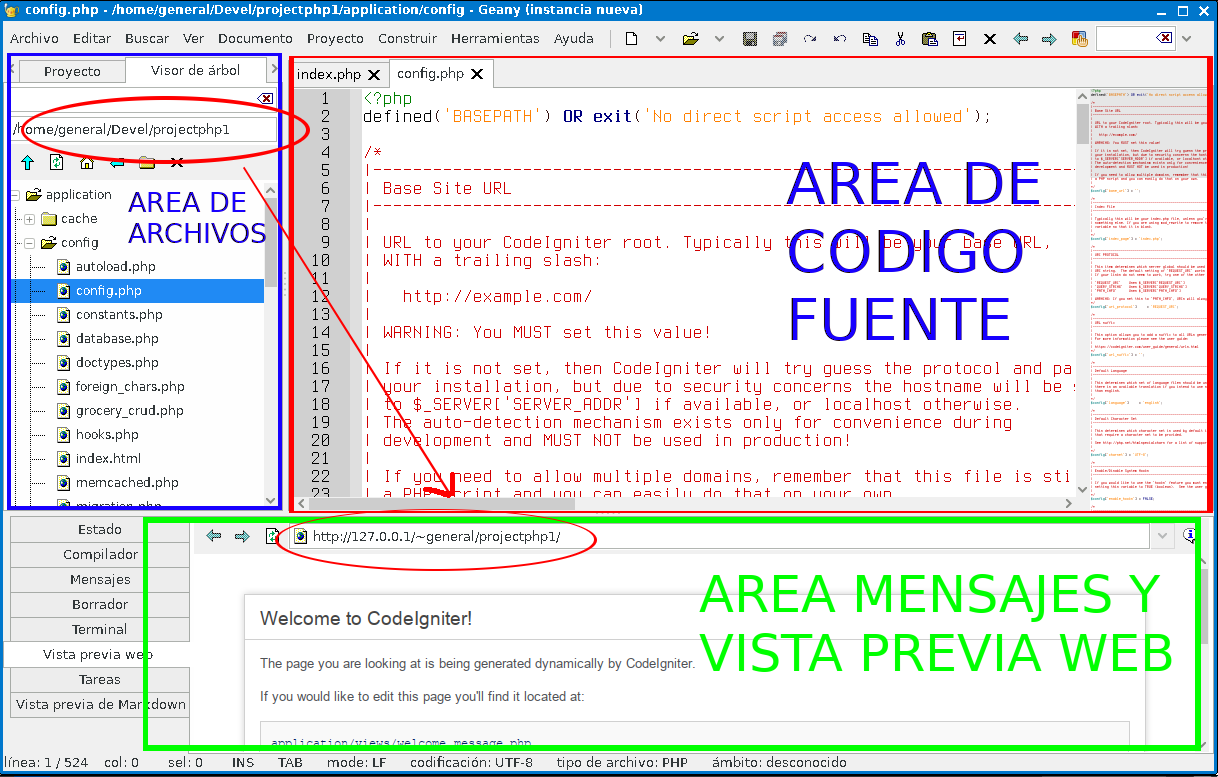
So the most used tool is the IDE (geany) editor here:
- In red is the source code area, each file you open or create new content is displayed in this area, there you place the code to display on the website.
- In BLUE are the files you manage where you click to open them or create new ones. This area if you configure the directory plugin shows all the files and not just the open ones.
- In GREEN is the activity message and web preview area, it's a mini browser and at the same time a mini terminal where you see the actions of the program.

From were i worked the projects?¡ the "Devel" directory
- You can created a new one in your new Devel directory, take note of that.. for us "Devel" is a standard directory and you must remain all your project in one place well organized
- Take one from gitlab or similar site and clone it (always will be a button to, just search at the project path on the web and copy the "clone path")
- The Web Service (lighttpd/apache2) was configured to server all from your "Devel" directory only.
.

.
Comentarios
Publicar un comentario
no stupid winbuntu users allowed!